Few things are more frustrating for a vinyl listener than a turntable that starts a session quietly and, after a short time, begins producing crackles, pops, or intermittent noise. The record may be clean, the stylus may look fine, and the system may have passed every quick test—yet the noise creeps in as minutes go by. In clinic-style diagnosis, this pattern is rarely “random.” When artifacts appear only after warm-up, they almost always point to a specific family of causes: thermal behavior, oxidation, or components operating on the edge of failure.
Before you assume the record is “suddenly noisy,” it’s worth re-centering what counts as normal behavior versus a true fault. That boundary is clarified in Constant Hiss vs. Occasional Pops: What’s Normal in Vinyl and What Signals a Problem—because many repairs go sideways when normal surface artifacts are treated like defects.
Understanding why these crackles appear requires thinking like a technician, not just a listener. A turntable is an electromechanical system with tight tolerances, tiny signal levels, and materials that shift as temperature rises. What sounds like a simple “pop” can be the audible symptom of instability in the infrastructure around the cartridge—not the groove itself. The goal of this article is to map the most likely causes and provide a clear, repeatable diagnostic path, step by step, grounded in restoration practice rather than guesswork.
Why Time Matters in Turntable Noise
When noise is present from the first second of playback, the suspect list is usually short and obvious: dirty records, a worn stylus, or gross grounding problems. When the noise appears only after several minutes, time becomes the diagnostic clue.
As a session progresses, several changes happen at once:
- Electrical components warm up and drift in value
- Metal contacts expand microscopically
- Oxidized interfaces change contact resistance under current
- Lubricants thin or migrate
- Marginal solder joints begin to open or close
Because the phono signal is measured in millivolts, tiny instabilities can become audible. Crackles that build gradually across multiple records are rarely caused by the vinyl itself and almost never by chance.
If the crackles also correlate with devices switching on/off (TV, lamp, fridge cycling, chargers), don’t ignore that pattern. The “external trigger” behavior often overlaps with warm-up problems, and the fastest way to separate them is the workflow in Turntable Only Makes Noise When Other Devices Turn On: Step-by-Step Ground Loop Diagnosis.
Heating Effects: When Temperature Alters the Signal
Thermal drift in electrical components
Vintage turntables and associated phono stages often rely on resistors, capacitors, and transistors that were never expected to remain perfectly stable decades later. As these parts heat up, their values can drift. A component that becomes noisy with temperature can inject intermittent artifacts into the most sensitive section of the chain—typically the phono preamplification stage.
In listening terms, this tends to present as sporadic crackles rather than constant hum. The noise may worsen as the unit reaches operating temperature, then stabilize—or continue degrading as heat builds.
Expansion and mechanical stress
Heat does not only affect electronics. Mechanical interfaces expand too. In a turntable, this can subtly change pressure at critical contacts:
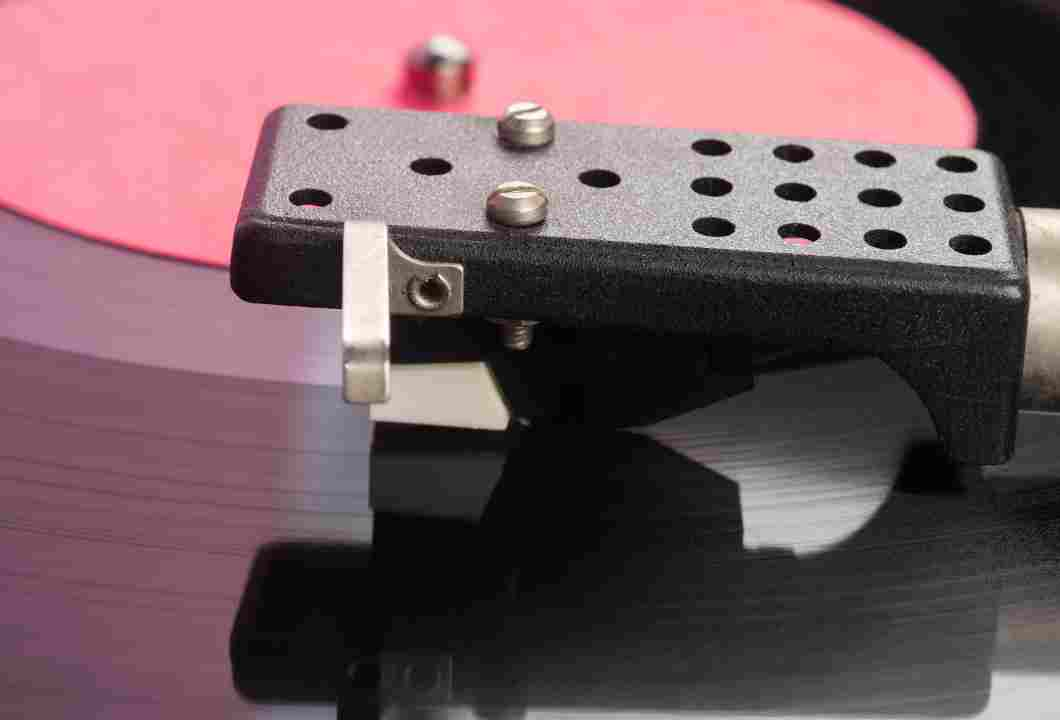
- Cartridge pins losing firm contact with headshell leads
- Tonearm wiring shifting against internal supports
- RCA connectors loosening microscopically at the jack
Any of these can momentarily interrupt continuity and create sharp transient noises.
Identifying heat-triggered noise
A strong indicator is repeatability. If the crackles begin after roughly the same time window and reduce again after cooling, heat isn’t merely “present”—it is acting as the trigger.
Oxidation: The Silent Enemy of Vintage Audio
Where oxidation hides
Oxidation rarely causes total failure. More often, it creates unstable contact resistance—which is far more deceptive, because the system still “plays.”
Common oxidation points include:
- Headshell contacts
- Cartridge pins and clips
- Tonearm connectors
- Muting switches inside the turntable
- RCA plugs and jacks
- Ground terminals
As current flows and temperature rises, oxidized surfaces can change resistance unpredictably. The result is intermittent noise that seems to come and go without warning.
If your symptom includes a channel that feels weaker once the crackles start—or the balance shifts subtly—run the quick isolation logic in One Channel Failing (L/R): A Quick Test to Identify Whether the Problem Is the Stylus, Cartridge, Cable, or Amplifier. Oxidation frequently shows up asymmetrically first.
Why oxidation gets worse over time
Oxide layers are not static. Heat/cool cycles can crack and shift the film, briefly improving contact and then worsening again. That’s why a system may play cleanly for a few minutes and then begin crackling.
In restoration practice, cleaning and restoring correct contact pressure often eliminates noise that was mistakenly blamed on cartridges or records.
Intermittent Failures: Components on the Edge
Cold or fractured solder joints
One of the most common causes of time-dependent noise is a cold or fractured solder joint. It may look intact, yet develop microscopic cracks over decades of thermal cycling.
As the unit warms, the joint expands and loses continuity. The result is a pop or a burst of crackles whenever the connection opens and closes.
Aging wires and insulation
Internal wiring in vintage turntables can become brittle. Tonearm wires are extremely thin and prone to failure at stress points. When heat slightly softens insulation or shifts wire position, a weakened conductor may intermittently lose connection.
Capacitors near end of life
While capacitors are often associated with hum or distortion, failing capacitors can also generate sporadic noise. As they heat, leakage can increase and inject instability into sensitive parts of the circuit—especially in phono stages and muting circuits.
Step-by-Step Diagnostic Process
Step 1: Eliminate the obvious variables
Start under controlled conditions:
- Use a known clean record
- Use a stylus confirmed to be in good condition
- Ensure the turntable is properly grounded
If the noise still appears only after warm-up, proceed.
Step 2: Isolate the turntable from the rest of the system
If possible, connect the turntable to a different phono stage or integrated amplifier.
- Noise disappears → suspect the phono stage / amplifier / system integration
- Noise remains → focus attention on the turntable’s interfaces and internal signal path
If hum is also part of the story, the decision tree in Turntable with hum (rumble): how to identify whether it’s grounding, cable, or phono preamp helps prevent treating a power/ground problem like a mechanical one.
Step 3: Inspect and clean all external contacts (before opening anything)
High-yield points first:
- Clean cartridge pins and headshell leads
- Clean RCA plugs and jacks
- Verify ground wire integrity and tightness
Use proper contact cleaner and avoid abrasives that remove plating.
If your turntable uses a detachable headshell, remember that the interface itself can be the fault multiplier. When cleaning helps but the issue persists, the compatibility/tolerance angle in Headshell and Mounting Standards: Compatibilities No One Explains becomes directly relevant—even in a “noise” problem.
Step 4: Monitor behavior during warm-up
Play a record and listen as the system warms. When crackles begin:
- Re-seat connectors gently
- Re-seat the headshell gently (if applicable)
- Lightly move cables near strain relief points
If the noise reacts to movement, you’re looking at intermittent contact—not “vinyl randomness.”
Step 5: Internal inspection (advanced)
For experienced technicians:
- Inspect solder joints under magnification
- Inspect/clean muting switch contacts
- Check continuity while gently flexing suspect points
- Look for heat-stressed components or discoloration
This is where troubleshooting turns into restoration.
Preventive Restoration vs. Temporary Fixes
Contact cleaner can quiet symptoms briefly, but it rarely solves the root cause if contact pressure is weak or a joint is fractured. Proper restoration may require:
- Reflowing compromised solder joints
- Replacing out-of-tolerance components
- Rewiring tonearms when necessary
- Restoring mechanical contact pressure at interfaces
A turntable restored at this level doesn’t just stop crackling—it regains predictability, stability, and sonic integrity.
Why These Problems Are Often Misdiagnosed
Surface noise is real, but it doesn’t reliably “start after ten minutes” across multiple records. Many enthusiasts blame records first, then replace cartridges next—often unnecessarily.
In workshop reality, time-dependent noise almost always traces back to infrastructure: contacts, joints, wiring, or a stage drifting under heat—not the transducer itself. Seeing that pattern clearly saves money, frustration, and irreplaceable original parts.
Listening as a Diagnostic Tool
One of the strongest restoration skills is learning to listen analytically:
- Oxidation crackle tends to be sharp, random, and contact-sensitive
- Thermal drift often builds gradually and repeats on a timeline
- Intermittent failures frequently react to vibration or re-seating
Training the ear to recognize these patterns turns listening into a diagnostic instrument as useful as any multimeter.
Bringing Silence Back to the Music
A properly restored turntable should disappear sonically, leaving only the music etched into the grooves decades ago. Crackles that emerge after warm-up aren’t “just vinyl”—they’re the system telling you where aging materials have become unstable.
Approach the fault like a technician: confirm heat involvement, clear oxidation at known interfaces, and isolate intermittent failures with controlled tests. That’s how you move beyond temporary quiet into true preservation—ensuring these machines keep translating motion into music with the quiet confidence they were designed to deliver.